Tabla de Contenidos
Setting up a home share
Introduction
In a professional environment, you setup the permissions on the share, containing the user homes, in a way that allows the automatic creation for new accounts, without setting ACLs manually.
Preparatory work
To continue, make sure, that you have read the Setup and configure file shares HowTo and have complied the preconditions.
Adding the share
- Add the new share to your smb.conf
 [home]
      path = /srv/samba/home/
      read only = No
Note: Don't name the share “[homes]”, as this is a special section (see the smb.conf manpage)! The “[homes]” section can't handle the automatic folder creation, we'll setup below!
- Create the folder that will contain the home directories later. The permissions will be set later.
# mkdir -p /srv/samba/home/
- Reload Samba, to take the changes effect
# smbcontrol all reload-config
Setting up the share and filesystem permissions
The following steps can be performed on any Windows client.
Note: If you have the requirement, that your users need to access their home folder locally on the server, too, you have to add a group that contains these user accounts. Add this group in all steps below and set the permissions to exactly the same than for “Authenticated users”. Of course this group must be available locally trough winbindd, sssd, nslcd, or other. This is required, because if the user log in locally on the server, there is no “Authenticated User”!
- Log on to a Windows machine using an account or member of a group, the “SeDiskOperatorPrivilege” was granted to.
- Open the Start Menu and search for “Computer Management”.
- In the menu bar, go to “Action” → “Connect to another computer”.
- Enter the name of your Samba server, you've create the new share on.
- Navigate to “System Tools” → “Shared Folders” → “Shares” and select the new added share.
- Right-click to the share name and choose “Properties”.
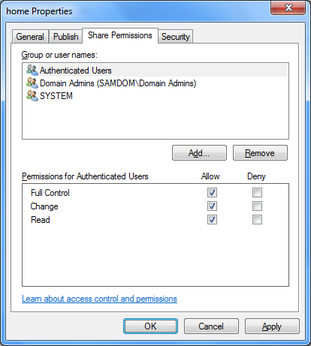
- Go to the “Share Permissions” tab.
- Change the share permissions to:
 Authenticated Users: Full Control
 Domain Admins:       Full Control
 System:              Full Control
If you have the requirement, that your users need access their home folder locally on the server, too, additionally or add a group that contains these user accounts. Because if the user log in locally on the server, there is no “Authenticated User”! The permissions for this additional group have to be the same than for “Authenticated users“
If this fails with a ”permission denied“ error, recheck, and check if you are using an account with SeDiskOperatorPrivilege privileges!
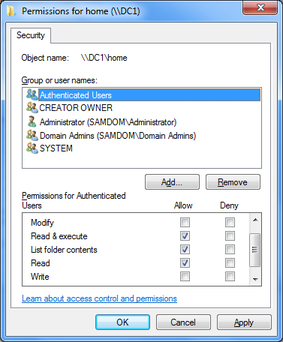
- Next go to the “Security” tab.
- Click, the “Advanced” button and in the appearing window the “Change permissions“ button. In the next Window, uncheck the “Include inheritable permissions from the object's parent” option. Close the windows with “OK” until you are back in the “Security” tab.
- Click the “Edit” button to modify the filesystem ACLs according to the following:
 Administrator:       Full Control
 Authenticated Users: Read & Execute, List Folder Contents, Read
 Creator Owner:       Full Control
 Domain Admins:       Full Control
 System:              Full Control
The “Creator Owner” permissions are automatically limited to “Subfolder and files only”. This is correct.
Close the “Edit” window with “OK” and return to the “Security” tab.
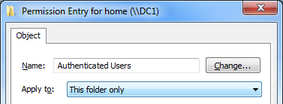
- To prevent „Authenticated Users“ to access the other users home folder, click the “Advanced” button again and in the appearing sub-window the “Change permissions” button. Select “Authenticated Users” from the list, click “Edit” and change the “Apply to” value to “This folder only”.
- Close all Windows with „OK“ to save the changes.
Define the users home folder in the account settings
For these steps, you must have the Microsoft RSAT (Remote Server Administration Tools) installed.
The account that is used for account creation must have the respective permissions in AD and on the home share (e. g. “Domain Administrator”).
- Open Active Directory Users and Computer (ADUC).
- Edit an existing user account (or create a new one first), by right-clicking and choosing “Properties”.
- If you plan to assign a UID in the “Unix Attributes” tab, then do this first and apply the changes. Then the user folders ACLs would include this UID, too.
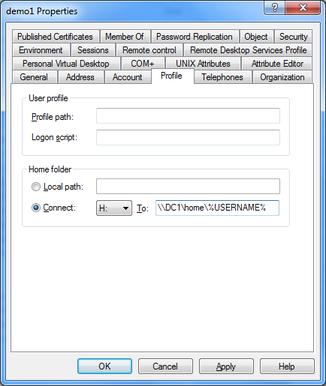
- Switch to the “Profile” tab. Choose a drive letter the home drive should be be connected to, and fill the “To” field with the path to the users home folder. You can use the variable ”%USERNAME%” instead of the individual username. This is useful, if you modify multiple accounts at once.
- Close the users properties window with “OK“ to save the modification. The users home directory is created on the fly during the save processes.
Validate the result
On Windows
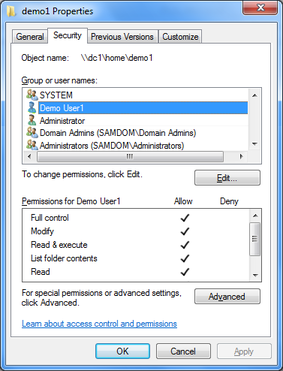
If you check the ACLs on the folder on Windows, you can see that the ACLs are applied as configured:
Only the defined users have permissions. „Authenticated Users“ are not inclueded and can't access the users home folder.
On *nix
On *nix side, you have to check the entire ACLs with getfacl, to see the extended ACLs.
Here is the getfacl output of the folder that is shown above in the Windows example:
 # getfacl /srv/samba/home/demo1

 # file: srv/samba/home/demo1
 # owner: 3000000
 # group: Domain\040Users
 user::rwx
 user:Administrator:rwx
 user:demo1:rwx                   <-- This entry only appears, if you had assigned a UID in the „Unix   Attributes“ tab before the home was created!
 group::---
 group:Domain\040Users:---
 group:3000000:rwx
 group:3000002:rwx
 group:3000008:rwx
 mask::rwx
 other::---
 default:user::rwx
 default:user:Administrator:rwx
 default:user:demo1:rwx           <-- This entry only appears, if you had assigned a UID in the „Unix  Attributes“ tab before the home was created!
 default:user:3000000:rwx
 default:group::---
 default:group:Domain\040Users:---
 default:group:3000000:rwx
 default:group:3000002:rwx
 default:group:3000008:rwx
 default:mask::rwx
 default:other::---
As some of the xIDs are may not be resolved, you can search for them in the local ID mapping database of Samba for them. Example:
 # ldbsearch -H /usr/local/samba/private/idmap.ldb xidNumber=3000000 dn
 # record 1
 dn: CN=S-1-5-32-544

 # returned 1 records
 # 1 entries
 # 0 referrals
As the xidNumber assignment is individual on each machine, there is no general translation table. But the output of the ldbsearcch command shows, that the entry with xidNumber 3000000 is assigned to the DN „S-1-5-32-544“. A list of well known security identifiers is provided by Microsoft: http://support.microsoft.com/kb/243330/en.


